教你使用TensorFlow2判断细胞图像是否感染

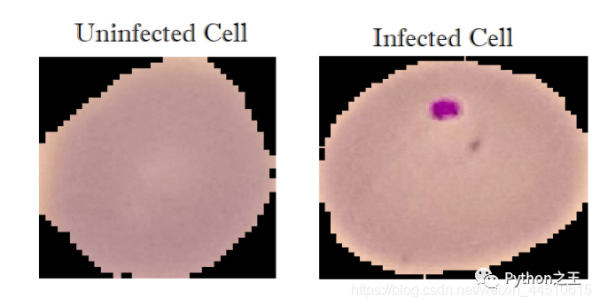
在本教程中,我们将使用 TensorFlow (Keras API) 实现一个用于二进制分类任务的深度学习模型,该任务包括将细胞的图像标记为感染或未感染疟疾。
数据集来源:https://www.kaggle.com/iarunava/cell-images-for-detecting-malaria
数据集包含2个文件夹
感染::13780张图片 未感染:13780张图片
总共27558张图片。
此数据集取自NIH官方网站:https://ceb.nlm.nih.gov/repositories/malaria-datasets/
环境:kaggle,天池实验室或者gogole colab都可以。
导入相关模块
import cv2 import tensorflow as tf from tensorflow.keras.models import Sequential from tensorflow.keras.layers import Dense, Conv2D, MaxPool2D, Flatten, Activation from sklearn.model_selection import train_test_split import numpy as np import matplotlib.pyplot as plt import glob import os
对于图片数据存在形状不一样的情况,因此需要使用 OpenCV 进行图像预处理。
将图片变成 numpy 数组(数字格式)的形式转换为灰度,并将其调整为一个(70×70)形状。
img_dir=”../input/cell-images-for-detecting-malaria/cell_images” img_size=70 def load_img_data(path): # 打乱数据 image_files = glob.glob(os.path.join(path, “Parasitized/*.png”)) + glob.glob(os.path.join(path, “Uninfected/*.png”)) X, y = [], [] for image_file in image_files: # 命名标签 0 for uninfected and 1 for infected label = 0 if “Uninfected” in image_file else 1 # load the image in gray scale 变成灰度图片 img_arr = cv2.imread(image_file, cv2.IMREAD_GRAYSCALE) # resize the image to (70×70) 调整图片大小 img_resized = cv2.resize(img_arr, (img_size, img_size)) X.append(img_resized) y.append(label) return X, y X, y = load_img_data(img_dir)
查看X的shape。
print(X.shape)
X的shape为(27558, 70, 70, 1),27558表示图片的数据,70*70表示图片的长和宽像素。
另外,为了帮助网络更快收敛,我们应该进行数据归一化。在sklearn 中有一些缩放方法,例如:

在这里我们将除以255,因为像素可以达到的最大值是255,这将导致应用缩放后像素范围在 0 和 1 之间。
X, y = load_img_data(img_dir) # reshape to (n_samples, 70, 70, 1) (to fit the NN) X = np.array(X).reshape(-1, img_size, img_size, 1) #从[0,255]到[0,1]缩放像素 帮助神经网络更快地训练 X = X / 255 # shuffle & split the dataset X_train, X_test, y_train, y_test = train_test_split(X, y, test_size=0.1, stratify=y) print(“Total training samples:”, X_train.shape) print(“Total validation samples:”, X_test.shape[0])
使用sklearn的train_test_split()方法将数据集划分为训练集和测试集,我们使用总数据的 10% 稍后对其进行验证。
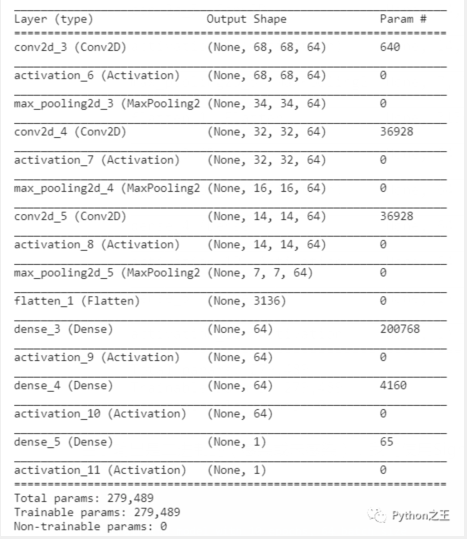
在建立的模型中,我们将添加 3 个卷积层,然后Flatten是由层组成的全连接Dense层。
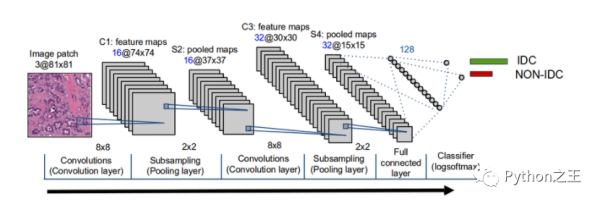
model = Sequential() model.add(Conv2D(64, (3, 3), input_shape=X_train.shape[1:])) model.add(Activation(“relu”)) model.add(MaxPool2D(pool_size=(2, 2))) model.add(Conv2D(64, (3, 3))) model.add(Activation(“relu”)) model.add(MaxPool2D(pool_size=(2, 2))) model.add(Conv2D(64, (3, 3))) model.add(Activation(“relu”)) model.add(MaxPool2D(pool_size=(2, 2))) model.add(Flatten()) model.add(Dense(64)) model.add(Activation(“relu”)) model.add(Dense(64)) model.add(Activation(“relu”)) model.add(Dense(1)) model.add(Activation(“sigmoid”)) model.compile(loss=”binary_crossentropy”, optimizer=”adam”, metrics=[“accuracy”]) print(model.summary())
由于输出是二进制的(感染或未感染),我们使用Sigmoid 函数作为输出层的激活函数。
# train the model with 10 epochs, 64 batch size model.fit(X_train, np.array(y_train), batch_size=64, epochs=10, validation_split=0.2)
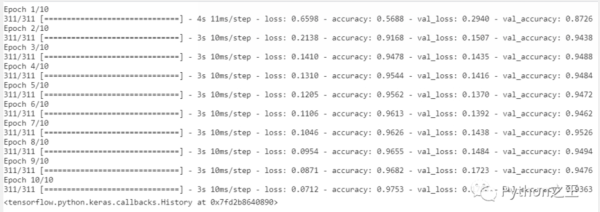
在训练数据集及其验证拆分上实现了94%的准确率。
现在使用evaluate() 来评估测试数据集上的模型
loss, accuracy = model.evaluate(X_test, np.array(y_test), verbose=0) print(f”Testing on {len(X_test)} images, the results are Accuracy: {accuracy} | Loss: {loss}”)
输出如下
Testing on 2756 images, the results are Accuracy: 0.9404934644699097 | Loss: 0.1666732281446457
该模型在测试数据中也表现OK,准确率达到94%
最后,我们将通过保存我们的模型来结束所有这个过程。
model.save(“model.h5”)
相关阅读
-

云安全日报210527:Ubuntu配套LZ4解压缩软件发现执行任意代码漏洞,需要尽快升级
Ubuntu是一个以桌面应用为主的Linux操作系统。它是一个开放源代码的自由软件,提供了一个健壮、功能丰富的计算环境,既适合家庭使用又适用于商业环境。Ubuntu将为全球数百个公司提供商业支持。 ...
查看全文 -
云计算核心技术Docker教程:清理未使用的Docker对象
Docker采取了一种保守的方法来清理未使用的对象(通常称为“垃圾收集”),例如图像,容器,卷和网络:除非您明确要求Docker这样做,否则通常不会删除这些对象。这可能会导致Docker使用额外的磁盘空...
查看全文 -

消息称亚马逊、微软、谷歌正竞购波音公司10亿美元云合同
新浪科技讯 北京时间5月27日晚间消息,据报道,四位知情人士今日透露,亚马逊、微软和谷歌这三大云计算服务提供商,正在竞争波音公司(Boeing)价值10亿美元的云服务合同。 这些...
查看全文 -
亚马逊难逃反垄断惩罚?美国又有三个州加入调查
新浪科技讯 北京时间5月27日晚间消息,据报道,多位知情人士今日称,继加州、纽约州和华盛顿州之后,马萨诸塞州和宾夕法尼亚州的总检察长也加入到对亚马逊的反垄断调查中。 如今,越来越...
查看全文
您好!请登录